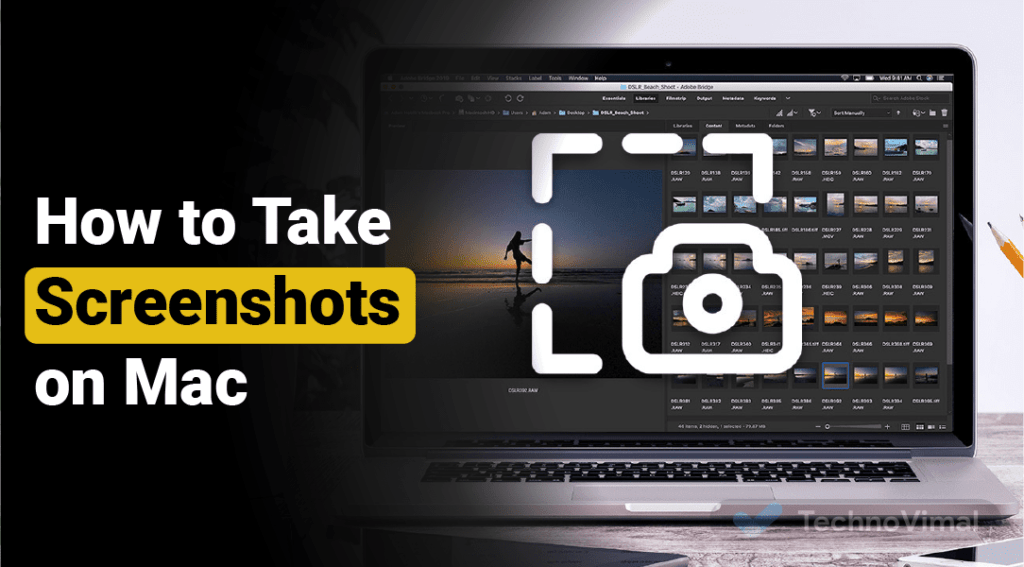
Mac is seen with most people nowadays. Those who keep using it are aware of its function. But those who get a new MacBook do not know about many things. One of these is (how to take a screenshot on Mac) to take screenshots in MacBook.
It is necessary to know how to take screenshots because we have to take screenshots of PDF, Image, Document, Video etc. But most people do not know about taking screenshots on MacBook.
Did you know you can take screenshots on Mac in three ways? And if you have a MacBook with Touch Bar, you have the fourth way. This post will tell you five keyboard shortcuts to take a screenshot on your Mac.
How to take a screenshot on Mac 2023
MAC (Media Access Control) Private Personal the computer. It has an entirely different operating system from Mac OS’s average computer. It works faster than a regular computer and is more capable than that. For this reason, mistakes are very few in Mac, and there is no risk of the virus coming into it.
However, a typical computer has a lot of software. With the help of which you can run many types of programs on a regular computer. But Mac has no match in processing. The conclusion is that if you want a more convenient computer, you should choose a regular computer and for a fast work computer, you should choose Mac.
When we make a massive score while playing a game, or we see something while running the computer that we have not seen before, or if we want to share our conversation on any social media site like Twitter or Facebook with someone.
Read Also: What is Brave Browser
The screenshot is considered the best option for that. Taking screenshots on Mac is very easy. You can easily take a screenshot of the whole computer screen or even some part of the screen if you want. Also, the screenshot is taken automatically on your computer. It gets stored in png format.
1. Take a screenshot of the entire Mac screen
Step 1: For this, first of all, open all the applications and windows of which you want to take a screenshot. You should also arrange them correctly on the screen.
Step 2: Now, you press Command + Shift + 3 together.
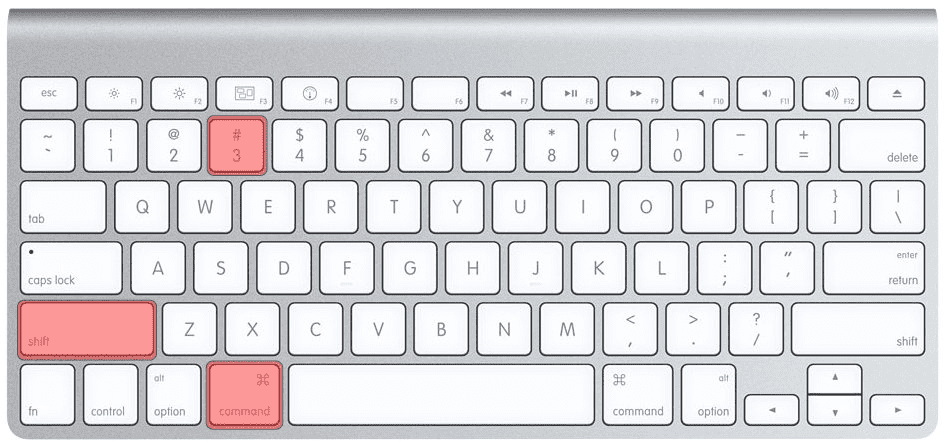
Step 3: Doing this lets you hear the sound of taking a photo from a camera.
Step 4: Take a screenshot of your screen. Shown in png format. Whose name (Title ) is Screenshot [Date + Time] .
Step 5: If you store this ( Save sure) and share it (choose if you want to share with a friend, click on it right and options Share Turn).
2. Take a screenshot of some part of the screen
Step 1: For this, also you first organize all the applications.
Step 2: And after that, you press Command + Shift + 4 . By doing this, your cursor will become a Crosshair.
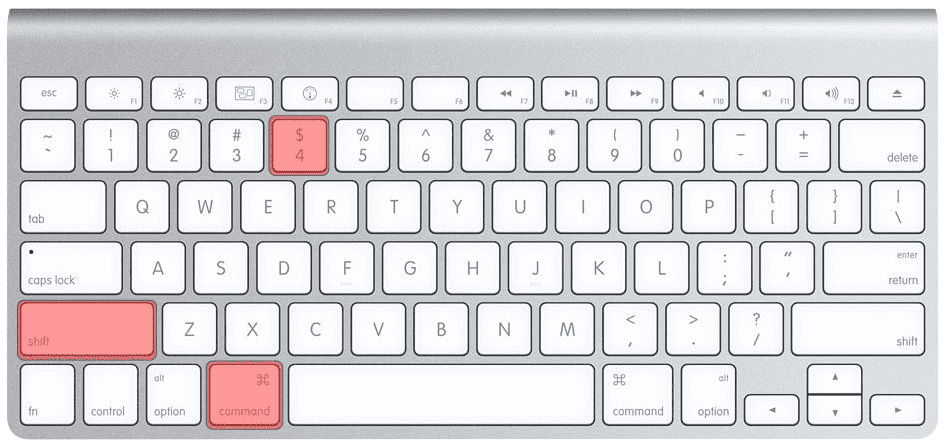
Step 3: You are shown a screenshot of the entire screen of the Mac. You can hold this Crosshair Cursor with your mouse and select the place you want to get as your screenshot. An outline appears around the image you selected. After selecting the place, you release the mouse button.
Step 4: In this way, you are shown the screenshot of the selected screen. Which you save, and if you want to share with your friends, then share.
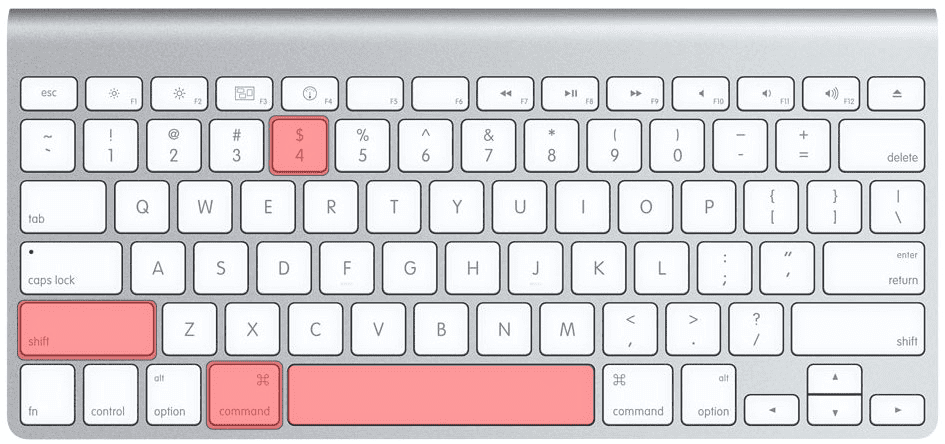
3. Take a screenshot of a particular window
Step 1: First, open all the applications and organize them.
Step 2: Now, you press Command + Shift + 4 together. By doing this, your cursor will become a Crosshair.
Step 3: After this, you press the Spacebar. This Crosshair Cursor takes a diminutive form of a camera.
Step 4: Now, move this camera above the window you want to take a screenshot. On top of that camera window, that window will turn blue.
Step 5: Click to get a screenshot. In this way, you get the sound of the camera taking a photo, and your screenshot is shown to you on the screen. Whose title is Screenshot [ Date + Time ] .
Step 6: You save it, and if you want to share it with anyone, then share it.
4. Take Screenshot from Mac Clipboard
Step 1: Arrange all the windows or applications you want to take a screenshot of.
Step 2: Now you press Command + Shift + Control + 3 together. So clipboard ( Clipboard to the screenshot).
Step 3: If you clipboard ( Clipboard ) and then want to take a screenshot of a window Command + Shift + Control + 4 press and then you Spacebar press.
Step 4: Then you go into the image editor, and from there, you Control + V to paste the screenshot by pressing and one save (and wishes to make changes Save Turn).
In this way, you can easily take screenshots on Mac. For other help regarding taking screenshots and print screen in Mac and personal computer.
Read Also: Netflix Premium Accounts & Passwords
How to take a screenshot on Windows 2022
Taking a screenshot on a laptop/computer is as easy as it is to take a screenshot on a mobile, but people do not know the right way, how to take a screenshot on a laptop and computer?
If you also want to take a screenshot on your computer or laptop, you have to follow the methods we are going to tell.
Read Also: How To Delete Administrator Account In Windows 11/10
Read Also: How to Reset Windows 11/10 Without Losing Data
Read Also: How to Enable Dark Mode in Windows 11
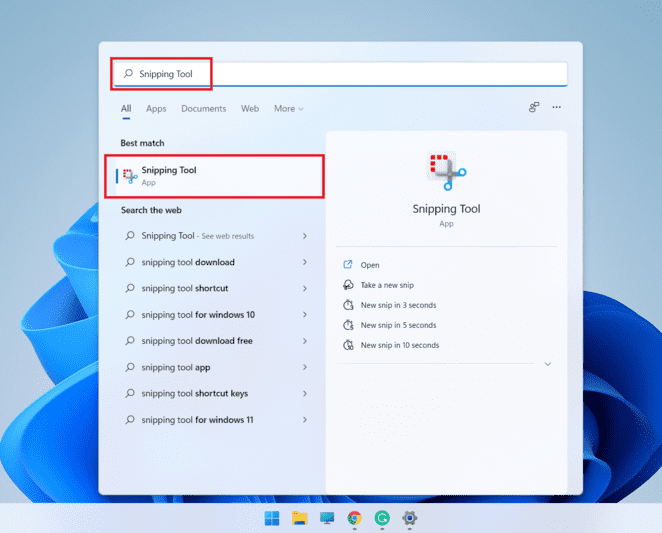
1. Use Snipping Tool to Capture Screenshots
The first and easiest way to take a screenshot on a Laptop and Computer is Snipping Tool. If you are a Windows user, then let me tell you that Snipping Tool is already present in all Windows systems, using which you can easily in Laptop and Computer. Can take a screenshot.
Follow these steps to take a screenshot with Snipping Tool:
- First of all, press the Window button on your keyboard.
- Now search by typing Snipping Tool.
- After finding the Snipping Tool in the search results, tap on it.
- Now click on the option of New in the Snipping Tool tool.
- Now to take a screenshot, press and hold the right click of the mouse and select the screen.
- After selecting the screen, release Right Click.
- Now save the screenshot by clicking on Save or pressing Ctrl + S.
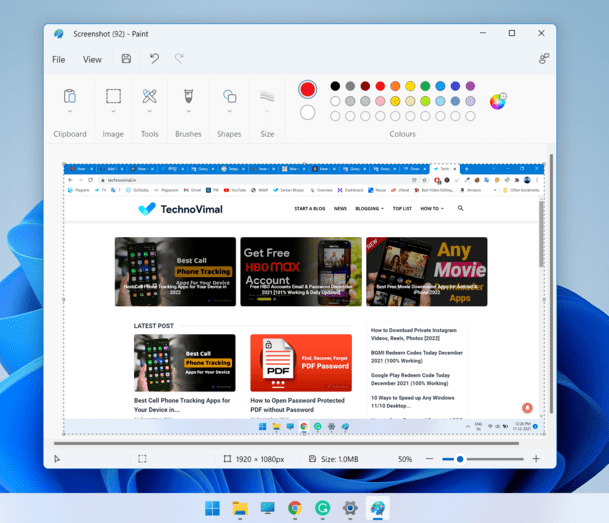
2. Take Screenshot with PrtSc Button and Paint
PrtSc A button is given on the computer keyboard. With the help of that, you can also take a screenshot. You will find this button on the Right Top Side of the keyboard. In the way we will tell you how to take screenshots on a computer/laptop, you will need Prnt Scrn and Paint App, which is already available in all Windows computer systems.
Follow these steps to take Screenshot from PrtSc button and Paint:
- Go to the screen where you want to take a Screenshot and press the Prnt Scrn button.
- Now open the Paint App.
- After going to Paint, paste the Screenshot by pressing Ctrl + V.
- Save Screenshot by pressing Ctrl+S.
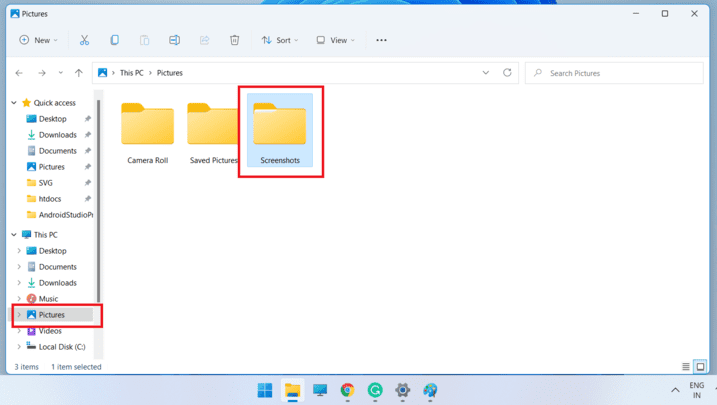
3. Take Screenshot With Shortcut Key
If you think about how to take screenshots on a computer and laptop in the easiest way, then this method will be easiest for you because you can take screenshots quickly with a shortcut key.
Follow these steps to take a Screenshot from Shortcut Key:
- Press Window + Prnt Scrn button to take a screenshot.
- Now open My Computer.
- Go to My Computer and go to Pictures.
- Now you will get a folder named Screenshots, open it, and get your screenshot.
Read Also: How to Change & Install Themes on your Windows 11/10 PC
Read Also: How to Disable Automatic Updates on Windows 11/10
Read Also: How to Upgrade Windows 10, 8, 7 to Windows 11 for Free
How to take a screenshot on computer FAQ.
What is Screenshot?
A screenshot, also known as a screen capture or screengrab, is a digital image that shows the contents of a computer display.
What is the purpose of taking a screenshot?
Screenshots show you precisely what you are on your screen. That’s why taking screenshots is beneficial.
How do I take screenshots on the computer?
Press Window + Prnt Scrn button to take screenshots on the computer.
What is the difference between photos and screenshots?
A photo is a picture created using a camera, and a screenshot is an image of the data displayed on the screen of a computer or mobile device.
Conclusion
Friends, today we have seen how to take screenshots on a computer and laptop (How To Take Screenshot On PC) in this article that how you can easily take screenshots on your Windows Computer and Laptop. If you like this information, then do share it with your friends. If you have any questions about this topic, How To Take Screenshot On Computer, we must tell by commenting.
