In today’s digital world, screenshots have become an essential tool for communication and documentation. Whether you’re a student, a professional, or just someone who wants to share something interesting you’ve found online, knowing how to take a screenshot on your Mac can be incredibly useful.
What is a Screenshot?
A screenshot is a digital image that captures the contents of your computer screen. It’s like taking a picture of your screen, allowing you to save and share what you see on your display.
Why Take Screenshots?
There are many reasons why you might want to take a screenshot. Here are a few common scenarios:
- To capture an error message: If you encounter an error message on your Mac, you can take a screenshot to send to a tech support representative for help.
- To share something interesting: If you find something interesting online, you can take a screenshot and share it with your friends or colleagues.
- To document a process: If you’re writing a tutorial or guide, you can take screenshots to illustrate the steps involved.
- To save a copy of a document: If you want to save a copy of a document that you’re viewing on your screen, you can take a screenshot and save it as an image file.
How to Screenshot on Mac
There are three main ways to take a screenshot on a Mac:
1. Using Keyboard Shortcuts
The easiest way to take a screenshot on a Mac is to use keyboard shortcuts. Here are the most common keyboard shortcuts for taking screenshots:
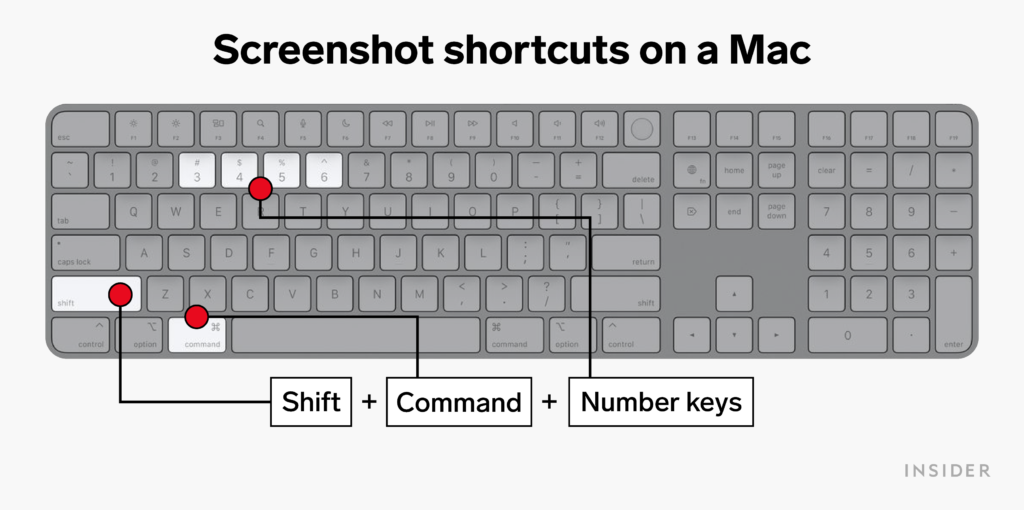
- Command + Shift + 3: Takes a screenshot of the entire screen.
- Command + Shift + 4: Takes a screenshot of a selected area of the screen.
- Command + Shift + 5: Opens the Screenshot app, which gives you more options for taking and editing screenshots.
2. Using the Screenshot App
The Screenshot app is a built-in Mac app that provides more options for taking and editing screenshots. To use the Screenshot app, follow these steps:
- Press Command + Shift + 5.
- Select the type of screenshot you want to take.
- Click the “Capture” button.
- The screenshot will be saved to your desktop.
3. Using Third-Party Apps
There are also a number of third-party apps that you can use to take screenshots on your Mac. Some of the most popular third-party screenshot apps include:
- Snagit: A powerful screenshot app that offers a wide range of features, including the ability to capture scrolling screenshots and annotate screenshots.
- Skitch: A simple and easy-to-use screenshot app that allows you to quickly capture and share screenshots.
- Lightshot: A lightweight screenshot app that lets you quickly capture and share screenshots without having to save them to your computer.
Different Types of Screenshots
There are four main types of screenshots that you can take on a Mac:
- Full-Screen Screenshots: Captures the entire screen, including the menu bar and the Dock.
- Partial Screenshots: Captures a selected area of the screen.
- Window Screenshots: Captures a single window on your screen.
- Timed Screenshots: Captures a screenshot after a specified delay.
Editing and Sharing Screenshots
Once you’ve taken a screenshot, you can edit it and share it with others.
Editing Screenshots:
You can edit screenshots using the built-in Screenshot app or a third-party screenshot app. Common editing features include cropping, resizing, and adding annotations.
Sharing Screenshots:
You can share screenshots by saving them to your computer and then sending them to others via email or messaging apps. You can also share screenshots directly from the Screenshot app or a third-party screenshot app.
Tips for Taking Great Screenshots
Here are a few tips for taking great screenshots:
- Use a High-Resolution Display: The higher the resolution of your display, the better your screenshots will look.
- Capture the Right Moment: When taking a screenshot of a website or document, make sure to capture the moment you want to share.
- Use the Right Tools: Use the right screenshot tool for the job. If you need to capture a full-screen screenshot, use the keyboard shortcut Command + Shift + 3. If you need to capture a partial screenshot, use the keyboard shortcut Command + Shift + 4.
- Edit Your Screenshots: Once you’ve taken a screenshot, take a few minutes to edit it. Crop out any unnecessary information and add annotations to highlight important details.
- Share Your Screenshots: Once you’ve edited your screenshots, share them with others. You can save them to your computer and then send them to others via email or messaging apps. You can also share screenshots directly from the Screenshot app or a third-party screenshot app.
Conclusion
Taking screenshots on a Mac is a quick and easy way to capture and share information. By following the tips in this guide, you can take great screenshots that will be useful for a variety of purposes.
FAQs
1. Can I take a screenshot of a specific window on my Mac?
Yes, you can take a screenshot of a specific window on your Mac by using the keyboard shortcut Command + Shift + 4 and then clicking on the window you want to capture.
2. How do I take a screenshot of a scrolling webpage on my Mac?
To take a screenshot of a scrolling webpage on your Mac, you can use a third-party screenshot app like Snagit or Skitch. These apps allow you to capture scrolling screenshots by automatically scrolling down the page and taking multiple screenshots that are stitched together into a single image.
3. Can I add annotations to my screenshots on my Mac?
Yes, you can add annotations to your screenshots on your Mac using the built-in Screenshot app or a third-party screenshot app. Common annotations include arrows, lines, shapes, and text.
4. How do I share my screenshots on my Mac?
You can share your screenshots on your Mac by saving them to your computer and then sending them to others via email or messaging apps. You can also share screenshots directly from the Screenshot app or a third-party screenshot app.
5. What are some good third-party screenshot apps for Mac?
Some good third-party screenshot apps for Mac include Snagit, Skitch, and Lightshot. These apps offer a wide range of features, including the ability to capture scrolling screenshots, annotate screenshots, and share screenshots directly from the app.
Custom Message
I hope this guide has been helpful in teaching you how to take screenshots on your Mac. If you have any further questions, please feel free to leave a comment below.
