Do you also want to build a Website Using WordPress or a blog, and you do not know how to Build a Website? If yes, then in this post, I will remove all your troubles because I will tell you how to Build a Website Using WordPress. So if you want to know all this, read this post carefully.
Today is the era of the internet and technology, so everyone connects their business to the internet by making a website to know about their business and sell more products or services. Also, nowadays, the trend of earning money by blogging online is going on, in which people are making money by creating a blog sitting in their homes.
If you also have a business or want to start an online business, creating a website is beneficial, but you probably know that coding is needed to build a website. But, do you know how to code using languages like HTML, CSS, PHP, and javascript?
Read Also: 33 Best WordPress Plugins That A Blogger Should Know?
If not, then do not take tense because I also do not know how to code, but I have also created many more websites using WordPress along with this Website. So for those people who do not know to code, WordPress is nothing less than a boon because it is such a website creation tool that anyone can create a professional website without touching the coding.
That’s why I will share this knowledge with you and tell you what is needed to make a WordPress website?; how do we create WordPress on the Website? And what to do after creating a website etc. So let’s know everything in detail-
What do you need to Build a Website – checklist?
If you want to make a WordPress website, then you must have the following four things-
- Laptop/Computer: If you do not have a computer, you can do it from a mobile.
- A Domain Name: This is the name of your Websites like google.com or technovimal.in
- Web Hosting: This is a server where your Website files are stored.
It takes 20 minutes to read this post and follow the given steps.
How Much Does a WordPress Website Cost in 2024?
Whenever we go to build a website, the first thing that comes to our mind is how much it will cost to build a website. Because, brother, money is everything. So here, let me tell you how much the cost of making a website depends on how much money you spend on what works.
For example, if you only have to take web hosting, you take which plan from which company. However, because there are many types of web hosting, I would advise you to buy shared hosting from any company if you build a new website because it is the cheapest hosting plan.
If you take shared hosting, it will cost around 5000-6000 rupees per year and 200-300 rupees for the domain name. In creating a website on WordPress, money is mainly spent in taking web hosting and domain name.
Read Also: A Complete Guide to SEO: What You Need to Know
Overall, your Website will be ready to be built in about Rs 6000. If you do not have that much money now, you can also take web hosting for a short time, like one month, three months, or six months. If you handle hosting for a short time, less money is spent, and later when it expires, you can renew it.
How to Build a Website Using WordPress in 6 Steps
Follow these six simple steps to Build a Website today.
Step 1. Register Domain Name
This is the first step to creating a WordPress website, in which you have to register a domain name for your Website. Domain Name is the name of any website that has to be purchased from the company that sells the domain.
So today, there are many websites on the internet where you can register a domain name, but I would advise you to do it from godaddy.com because it is the most trusted company and gives a cheap pay domain name.
If you have never taken a domain name, do not take tension because it happens like you buy some goods from a shopping website.
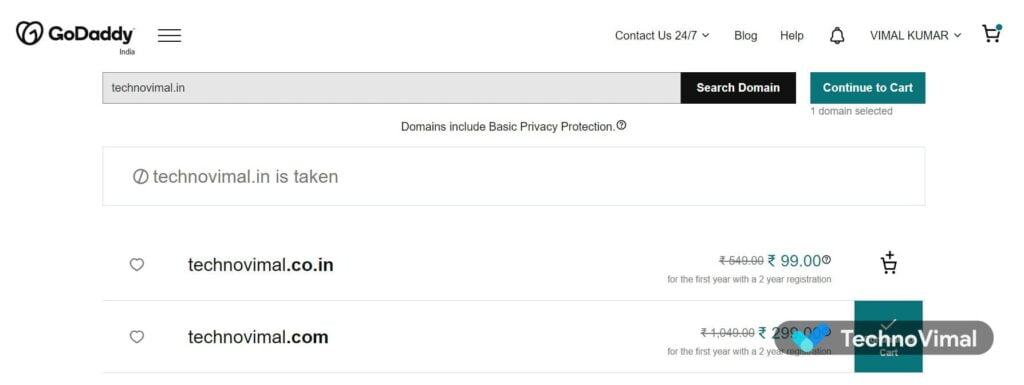
1. First of all, you go to godaddy.com.
2. Here, you will see a big Domain Name search bar. In this, you enter the name of your Website and click on search. After the search is done, the searched domain name list will come with different extensions. From this, click on the “add to cart” button next to the domain name you want to register and then finally click on the “continue to cart” button, as shown in the image below.
3. Now, you will get a list of services to take along with the domain name. Select no thanks in all of you and click on continue to cart given below.
4. Now, your domain name will appear under “Your Items” on the page that will open. Please select the number of years you want to register it. At least you can take the domain for one year only, not less than that. If you take it for 2-3 years, the money will also cost more.
5. Now, you have to create a GoDaddy account, and you click on “create an account.” If you have already created an account on GoDaddy, fill in the details by clicking on login and logging in.
6. After login, you will be asked to fill in your billing information, in which you have to give your name, address, and number and select the method by which you want to make payment. You can also pay with your debit card, credit card, and UPI.
7. Now, you will be asked to fill in the details of the method by which you want to make payment. After filling in the details and submitting, a new page will open to give OTP. If you do OK by entering OTP, your domain will be successfully registered and added to your GoDaddy account.
Step 2. Buy Web Hosting
Now that you have registered the domain name, web hosting is the next critical need. Like the domain, there are many websites or companies on the internet for web hosting from where you can buy web hosting.
But because web hosting is the storage of any website, we should take hosting from a trusted company so that we do not have to face any problems later.
Now you must be wondering which company is good. Let me tell you that Hostgator, Bluehost, A2Hosting, Resseler Club, etc., are very trusted companies that give good hosting plans very cheaply. The most crucial thing is that you have an excellent support system in them. I will get to see If you face any problems, then this company will solve the issue soon.
Read Also: How to Start Affiliate Marketing (A Step-by-Step Guide)
I would advise you to take hosting from Hostgator India (the branch of Hostgator company only in India) because you will get hosting cheaply here. I have also taken hosting for my Website from this company. Taking hosting is also very easy. As you take a domain name, you must choose the plan in the beginning according to your need.
1. First of all, go to Hostinger. And click on the “Get Started Now” button below.

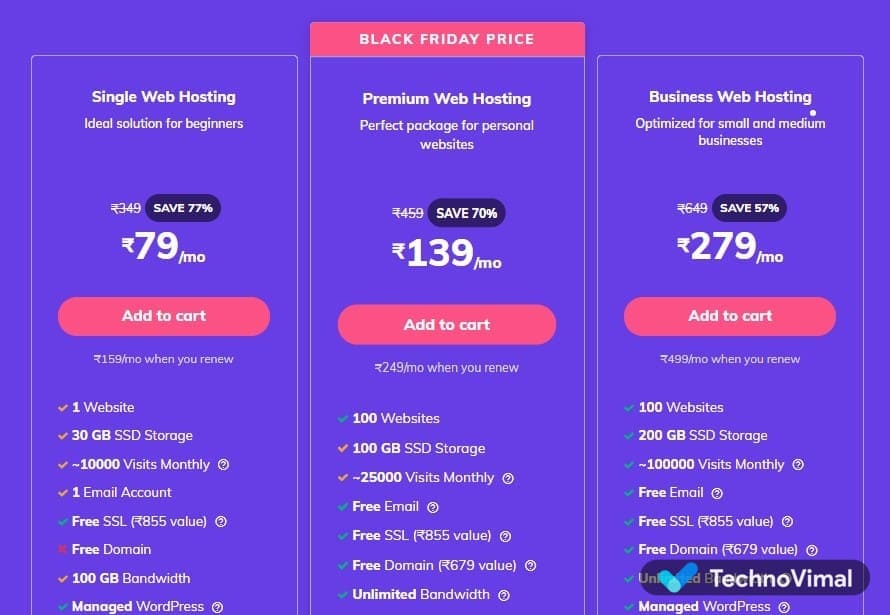
2. Now, a list of different shared hosting plans will come before you. At the bottom of every project, the features given in it are written. After reading, you can select any web hosting plan according to your need.
3. I would advise you that if you want to make only one Website, then take a hatchling plan and if you’re going to make more than one Website, then take a baby plan because, in this plan, you will get unlimited disk space domain and bandwidth. In whatever method you want to take, click on “buy now” given below.
4. Now, a small popup will open in which you will be asked, “Do you have a ready domain name for the hosting plan” in this, you have to enter that domain name by clicking on yes. If there is some service option below, then unselect it and click on continue.
5. A separate page will open in which the hosting you have selected will appear, and next, there will be an option to choose the duration for hosting. Select the time you want to take hosting and then click “continue.”
6. Now, you will be asked to log in. If you already have an account on Hostgator, log in by giving the user name and password; if you do not, create a new report by clicking “Create an account” and logging in.
7. After logging in, you can select the payment method in front of you. Next, choose the mode you want to make payment and then click on continue to payment. Now a payment page will open where you must fill in your details and make an online payment.
When the payment is made successfully, the hosting plan will be added to your HostGator account, which you can manage according to yours.
Step 3. Point Domain Name To Web Hosting
In the third step of creating a WordPress website, we must connect our domain name to the hosting point. When we take the domain name and web hosting from different companies, they must be attached.
If you have taken domain and hosting from the same company, then there is no need to point, but most people take it from a different company, and in this post, I also have taken domain name from godaddy.com whereas web hosting from Hostgator. In. So that’s why we need to connect our GoDaddy domain to HostGator’s hosting.
Pointing domain names to web hosting is straightforward; you will understand it immediately. You must copy the hosting’s name server, paste it on the domain’s name server, and save it.
Now you must be thinking that what is the name server of hosting? How to know? So there are two ways. First, talk to your hosting company’s customer care and ask. Secondly, your name and server details are also given from whichever Website you host. You have to follow these steps like this-
- First of all, go to your Hostgator. and log in.
- Now click on manage order and then click on list/search orders. Now click on the domain name you entered while taking hosting.
- Now, a new page will open. Scrolling down a bit will show your hosting plan. Some options are below. In this, you click on Name server details. On connecting, a small popup will open in which your name server is there and copy it.
- You must log in to the domain name from where you took it and add the copied name server. For example, if you have taken the GoDaddy domain, sign in there.
- After login, go to Manage Domains. Now your domain name will appear in front of it by clicking on Manage DNS and clicking on the set name server. Select and save the custom name server by adding all the copied name servers.
After doing this, your domain name will be connected to your hosting server, and now you are ready for the next step.
Step 4. Install WordPress
Now you have to install WordPress on your hosting server. WordPress software must be installed and used on the hosting server. New user finds it difficult to install WordPress, but it is very hopeful. Just follow the steps given below-
- Open the Cpanel of your hosting. If you have taken hosting for the first time, you probably do not know how to open hosting Cpanel. For this, you log in to the hosting Website and open it by clicking on your hosting plan. If you have taken hosting from Hostgator, click on manage order and list/search order.
- Now click on the domain name from which you took the hosting. This will open a new page where scrolling down a bit. There is an option to manage web hosting under your hosting plan. Click on it. Now your Cpanel will open in a popup window.
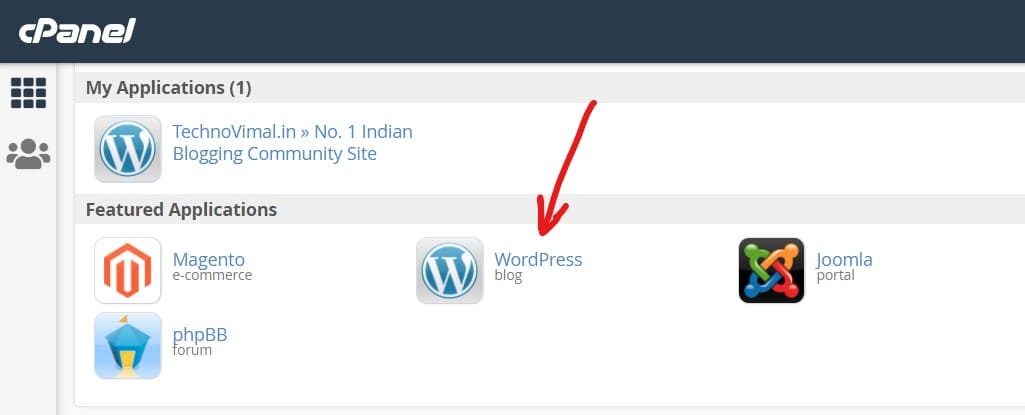
- Click on WordPress in SOFTACULOU APP INSTALLER.
- Now, a new page will open in which the details about WordPress will be visible. Next, click on the “install now” button given below.
- Now, a form will appear in which some WordPress installation details must be filled in. This setting is divided into a separate section, filling the details like this.
Software Setup:
Select the version you want to install, the latest version of WordPress.
Choose Protocol: You select protocols like HTTP, HTTPS, HTTP/www, etc. You can choose this according to your own.
Choose Domain: In this, you select the domain name for creating a website by installing WordPress.
Directory: Default wp will be written in it, which should be removed and blanked.
Site Setting: Below the software setup is the section of site setting, in which you have to enter the title and description of your Website. Leave Enable Multisite (WPMU) untick.
Admin Account: Below the site setting is the option of the admin account, and in this, you enter the admin user name, admin password, and admin email id. Remember all this because you can log in to the WordPress admin area.
Choose Language & Select Plugin: After the Admin account setting, there are two more sections for choosing the language and selecting plugins. In language, you can select the language of the admin area, but I would advise you to leave it as default English. And also, leave everything to untick, i.e., default in the select plugin.
Install: Now enter your email id in the Email installation details at the bottom, in which the installation details of your site will be sent by email. After entering the email id, click on install.
After doing this, WordPress installation will start. On the screen, you will see the status bar in which WordPress installing status will be shown. WordPress installation may take 1-2 minutes to complete, which depends on your internet speed.
As soon as the installation is complete, you will get a message of success, and some links will be given below, like the URL of your Website, the URL of the admin login, etc.
To login to the WordPress dashboard, i.e., admin area, the URL is like this- http://yoursite.com/wp-admin, and by going to this URL, you can log in by entering your username and password.
Step 5. Change WordPress Website Theme
As soon as you install WordPress, your Website is ready, and you can manage your Website from the WordPress dashboard. However, on installing WordPress, a default theme is applied to your Website, which is not that good, and it may not be according to your needs.
In such a situation, you must change the theme of your Website and apply your favorite music. But how will this happen? This task is not difficult, and the Website’s article can be changed easily.
First of all, you go to your WordPress dashboard and click on Appearance. Now a list of all the themes installed in your WordPress will come before you.
Click add new to add a new theme. Now a list of many articles will come before you, from where you can select any theme and click on install. After installing, click apply so the music will be used on your Website.
If you want to download a WordPress theme from a different theme website and apply it to your Website, you can upload the article and use it by clicking on upload above the theme list.
Step 6. Install Plugins
Plugin in WordPress is a unique feature through which we can add different functionality to our Website. All WordPress users must use plugins on their Websites because of this. The Website can be made even better.
You can also install the plugin according to your need. You have to go to your WordPress dashboard and click on Plugins. Now install and activate any plugin by clicking on add new. If you want to search for a particular plugin by name, you can search by typing in the search bar above.
Conclusion
I hope you have understood well how to make a WordPress website, and now you can easily create a website on WordPress for yourself or your clients. For your information, let me tell you that out of all the websites worldwide, 30% of the websites are built on WordPress, so do not think you are making a website on the wrong platform.
I constantly endeavor to give information to the user in correct and straightforward language so that everything is well understood. In this blog, you will get complete details on WordPress to Build a Website as you like using WordPress.
In the end, I would like to tell you that if you liked this post on how to Build a Website on WordPress, share it on social media so that more people can learn it, and if you want to ask something, then comment.
