Cloudflare CDN: It is a well-known fact that the loading of a website page is one of the most important factors for search engine rankings these days.
To speed up the website loading speed, we use various techniques such as speeding up image loading, Optimizing Javascript, Optimizing CSS, Checking Plugins, Using a Content Delivery Network (CDN), Using Gzip Compression, Minimizing the Use of Web Fonts. There are many things that we use to speed up our website.
Google has already told in an update that if your website’s loading speed is fast, your website’s Search Ranking will also be good.
What is Cloudflare?
Today we are going to tell you about Cloudflare. What is Cloudflare, how does it work, how to setup it on your website. For your information, let us tell you that Cloudflare is a very popular and free CDN (Content Delivery Network).
Cloudflare CDN (Content Delivery Network) is a very popular Caching Plugin. With this, the content of your website can be traced from servers all over the world.
Cloudflare CDN caches a website’s content from each server so that your website can be protected from spam. This means that Cloudflare protects you from damage to your website.
Read Also: Rank Math SEO Pro Download for Free
Means Cloudflare increases the security of your website. Cloudflare first checks the traffic coming to your website and does not allow Spam Traffic to go to your website.
You will get all the basic features of Cloudflare for free. But if you want, you can also take advantage of the advanced features of Cloudflare regarding its paid version.
Why is Cloudflare better than other CDNs?
- You will get to see the Analytics of all the requests on the website.
- The SSL certificate can be easily installed.
- Network gateway is found between Protocols.
What should you have?
What do you need to have before starting this guide?
- You should have access to your domain name registrar control panel.
- You must have access to the WordPress admin area.
How to Setup Cloudflare CDN in WordPress Blog? 2022
The above told us what Cloudflare is, the benefits of Cloudflare, and what you should have to set up Cloudflare. Here we will speak about how to setUp Cloudflare CDN in WordPress Blog.
Read Also: 33+ Best WordPress Plugins & Tools for Your Site.
Step 1: Cloudflare create Account
Cloudflare website at things and make Cloudflare Account Sign Up Click on the button. Fill in all the necessary details there and create your account.

Note: If you already have a Cloudflare account, then you can skip this step.
Step 2: Adding your domain to Cloudflare
Once you have signed up in Cloudflare, then after that you will be asked to add your website there. Enter your website domain name and click on the Scan DNS Records button to proceed.

Note: Remember this thing that the scan may take a few minutes to complete.
Step 3: Check the DNS Records of your Domain Name in Cloudflare
After the scan is over, you will be shown your domain name DNS details. In this step, you can enable or disable Cloudflare for any specific subdomains. The Orange Cloud option will allow Cloudflare to for any particular DNS record, and the Gray Cloud option will disable Cloudflare.
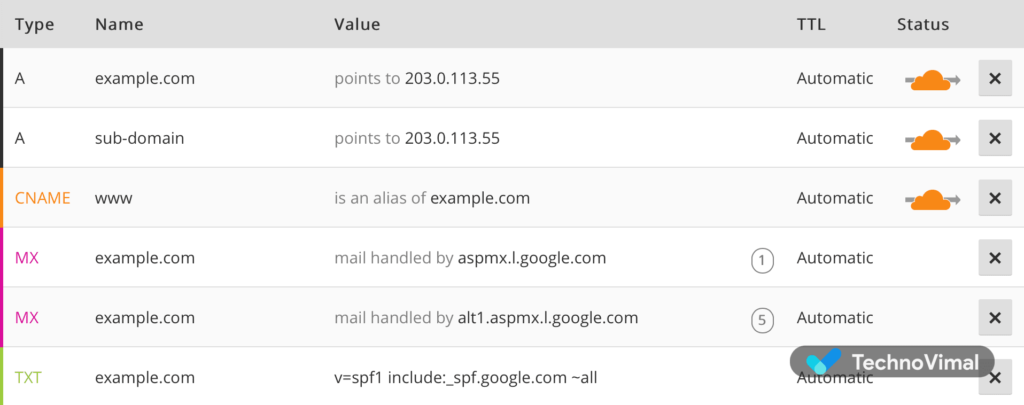
It is recommended that Cloudflare should be enabled for the naked domain name and www subdomain (as shown in the picture). In this way, Cloudflare will work in both www and non-www versions of your domain.
After this is done, press the Continue button and go to the next step.
Read Also: 150+ Guest Posting Sites List For SEO
Note: It is forbidden to enable Cloudflare for Cpanel, Mail, FTP, or any other system reserved subdomains, leading to various types of DNS issues.
Step 4: Move Your Domain Name to Cloudflare Nameservers
In this step, you will be asked to choose Cloudflare Plan. Select a free plan and press the Continue button again.
Now you will be given Cloudflare nameservers. Now login to your domain registrar control panel and move your domain nameservers to Cloudflare nameservers.
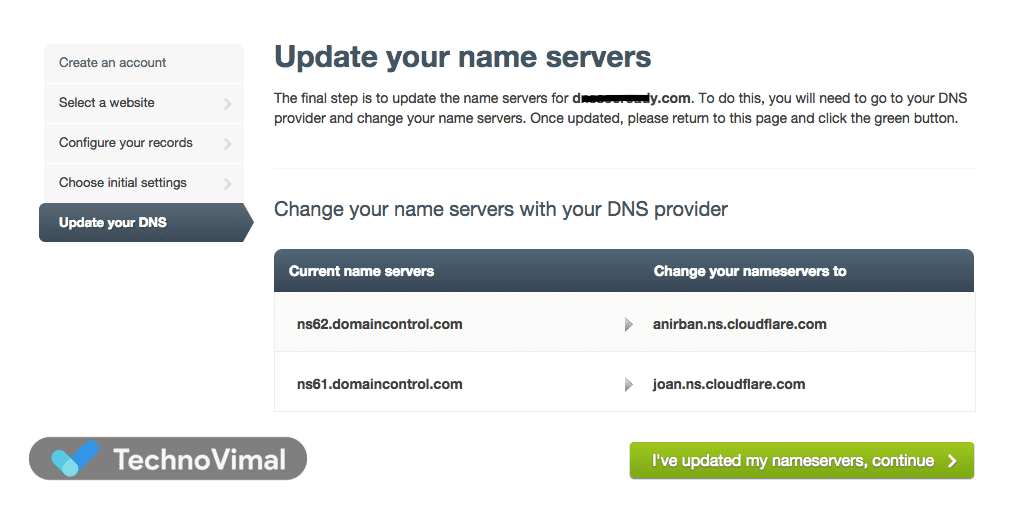
Once again, press the Continue button.
Note: It can take up to 72 hours for DNS to propagate around the world. You will get an email confirmation message from Cloudflare once the Nameservers update is complete. You can also check its status on the Cloudflare website. There will be no effect on your website during this process.
Step 5: Install and Configure Cloudflare Plugin in WordPress
There is also Cloudflare’s WordPress Plugin, which has given many important features.
- One-click WordPress optimization
- Web application firewall (WAF) rulesets
- Automatic cache purge
- Statistics
- Cloudflare Settings can be changed without opening the cloudflare.com dashboard
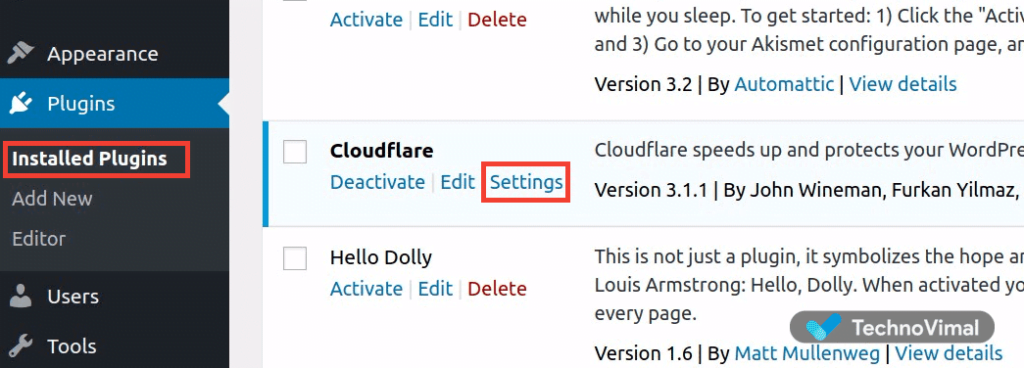
Login to your WordPress admin area and install the Cloudflare WordPress plugin.
After the installation is complete, start the configuration of the Cloudflare plugin. Go to the Plugins section and click on the Installed Plugins button. Next, find the Cloudflare plugin and click on the Settings button.
You will be prompted by Cloudflare Login Page, where you will need to enter your Email Address and API Key. Click on the Get your API Key from here button.
A window will pop up, and your CloudFlare account will be opened, where you will find your API Key inside the API KEY section.
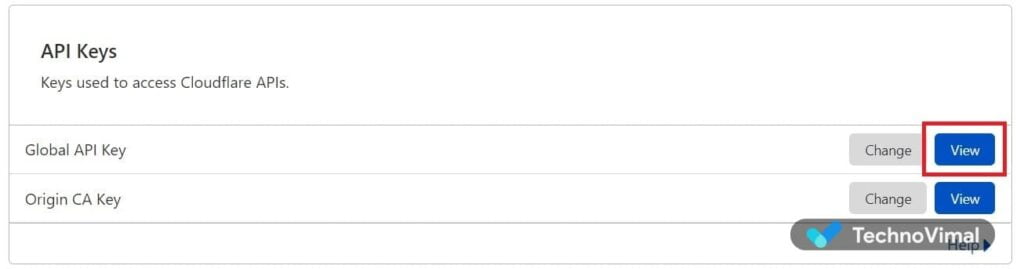
After getting the API Key, enter your email address and API Key inside your WordPress website and click on the Save API Credentials button.
When you are transferred to the Cloudflare settings page, click on the Apply button, which you will find under the Apply Default Settings section. You can use the default Cloudflare settings for WordPress websites.

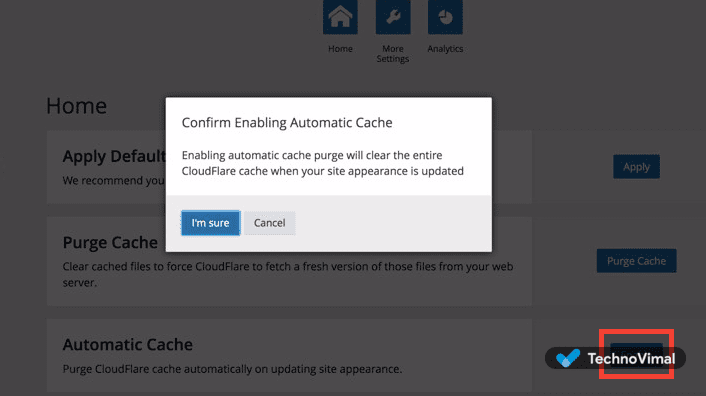
It is always recommended to enable Automatic Cache. To do this, click on the Apply button inside the Automatic Cache section.
Allowing Automatic Cache Purge will clear the entire Cloudflare Cache whenever your website design is updated.
Conclusion
Now you have learned about activating Cloudflare and configuring the Cloudflare WordPress plugin. This is the best way to speed up the website, and it can also avoid DDoS attacks.
")